How to Effectively use Phrases in Composition Writing
ENVIRONMENT
Solid waste management
Identifying solid waste
- Solid waste is a type of waste that consists of everyday items that are thrown away by people.
- Solid waste is also known as rubbish, garbage or trash
- Solid waste comes from our offices, homes, schools, industries and hospitals among other places.
- Solid waste management is the process of collecting, treating and disposing of solid waste. It’s about how solid waste can be changed and used as a valuable resource.
Classifying waste.
- Wastes are classified as both those that decompose easily and those that do not decompose.
- For example:
- Tomato fruit brakes down and starts to rot and eventually becomes part of soil. This is called decomposition.
- The plastic bottle did not show any change after a week. Therefore, the plastic bottles do not rot. It cannot decompose.
Ways of managing solid waste
- Different types of waste are managed differently. These ways include the
3Rs – Reusing, Recycling and Reducing.
- Reusing
Some solid waste can be used again for their original purpose or for different work. For instance, discarded bottles can be cleaned and used for bottling drinks, or used at home for other tasks.
Other reusable solid waste include boxes, bags, old clothes, books, old newspapers and wood.
b. Recycling
Recycling solid waste means that the material is reprocessed before being used to make new products. All types of organic waste can be recycled by composting.
Other solid wastes that can be recycled include paper, waste metals, glass and plastic bottles, among others.
c. reducing
Waste reduction is a set of processes and practices intended to reduce the amount of waste produced.
It is a way of preventing materials from ending up as waste. This can be done by buying products with less packaging, making use of reusable rather than disposable items, using your own shopping bags, minimizing food waste and repairing and maintaining items such as clothing, so that they last long.
Solid waste can be reduced through the following ways
- Avoiding using plastic bags to carry items. Instead use baskets.
- Using reusable (canvas) bags for buying items
- Borrowing, renting or sharing items that are not regularly used.
- Using sponges or dish clothes instead of paper towels.
- Using plug-in appliances instead of battery 0perated gadgets.
- Buying durable and repairable products.
Project
a. Making dustbins using locally available materials
B. making a toy car (refer learners book pg. 65-66)
COMPUTING DEVICES
Handling data – word processing
A word processor is computer software used to compose, format, edit and print documents. Examples include:
- Microsoft word
- Open office .org Writer
- Word pad
- Word perfect
- Open office writer
Creating a word document
- Open Microsoft word 2010 by searching through windows “Microsoft word”
- Launch Microsoft word 2010 by double clicking.
- On the landing page (immediate page) click blank and Microsoft word 2010 document will open
Components of A word document
They include:
- Title bar
- Ribbon
- Horizontal scroll bar
- Status bar
- Quick access toolbar
- Typing area
- Vertical scroll bar
Keying information (typing)
- Create a word document
- Key in the information by doing the following:
- Type on the keyboard to create text
- Use the mouse to move the insertion point (blinking line – indicates where you can enter or key in text on the page) to a specific place in your document. Click the location in the text where you want to place it.
- Key in the information by doing the following:
- Press the spacebar on the keyboard to add space after a word or in between text.
- Press enter on the keyboard to move the insertion point to the next paragraph.
Editing a word document.
a. Click and drag across the text you want to select.
You can select any amount of text with this method, from a single character to your entire document.
Here are some other ways to select text you’ll find useful:
- Press and hold down the Shift key, and move the insertion point either with your mouse or the arrow keys to select text.
- Double-click a single word to select it.
- Press the Ctrl key and click in a sentence to select it.
- Triple-click in a paragraph, or double-click in the left margin next to a paragraph, to select it.
- Click in the left margin to select an entire line, or click and drag in the left margin to select multiple lines.
- Press Ctrl + A to select everything in the document
Edit Text
Select the text you want to replace, then start typing the new text.
Changing font size
- Create a word document
- Type a short essay on good citizenship
- Select the text you want to edit
- left – click or long press the drop-down arrow next to the font size box on the home tab.
- Move your cursor over the various font sizes
- Left-click the font size you want to use. The font size will change on the document.
Changing font style
- Use the text you typed on good citizenship. Select the text you want to edit.
- Left-click the drop-down arrow next to the font style box on the home tab.
- Move your cursor over the various font styles
- Left-click the font style you want to use. The font style will change in the document.
Changing font colour
- Use the text you typed on good citizenship. Select the text you want to edit
- Left-click the drop down arrow next to the font colour box on the home tab.
- Move your cursor over the various font colours.
- Left-click the font colour you want to use. The font colour will change in the document.
Changing text into bold, italic and underlining
- Open an existing word document or start a new document and type your text.
- Change some of the text that you have already types to a different font
- Select the text that you wish to edit or change for the formatting.
- To change the selected font to bold, click B in the formatting ribbon at the top of the document
- To change the selected font to italics, click I in the formatting ribbon at the top of the document
- To change the selected so that it is underlined, click U in the formatting ribbon at the top of the document
Changing Text Case
- Select the text you want to edit
- Click the change case command in the font group on the Home Tab.
- Select one of the case options from the list.
- Write down the different options on the case list.
Changing text alignment
- Open an existing word document or start a new document and type your text. The default layout is left align, where text will be aligned to the left margin of the document.
- To change the layout of your text, select the text that you wish to change using the mouse.
- To center the selected text, click on
icon in the formatting ribbon at the top of the document.
To right align the selected text, click on icon in the formatting ribbon at the top of the document.
- To left align the selected text, click on
icon in the formatting ribbon at the top of the document.
- To justify text so that it is aligned both right and left, click on
icon in the formatting ribbon at the top of the document.
Inserting Text
- Create a new word document
- Type some text into the document
- Move your mouse to the location where you want text to appear in the document.
- Left-click the mouse. The insertion point appears.
- Type the text you want to appear.
Deleting text
- Create a new word document
- Type some text into the document
- Place your cursor next to the text you want to delete
- Press the backspace key on your keyboard to delete text to the left of the cursor.
- Press the Delete key on your keyboard to delete text to the right of the cursor.
Selecting text
- Create a new word document
- Type some text into the document
- Place the insertion point next to the text you want to select.
- Left-click your mouse. While holding it down, drag your mouse over the text to select it.
- Release the mouse button. You have selected the text
- A highlighted box will appear over the selected text.
Copying and pasting
- Create a new word document
- Type some text into the document
- Select the text you want to copy
- Click the copy command on the Home Tab.
- Place the insertion point where you want the text to appear.
- Click the paste common on the Home tab. The text will appear.
Saving a document
When saving the document for the first time:
Choose file. Then save from the menu bar. The save as dialog box appears
- Another option is clicking the save button on the standard toolbar. Then save as dialog box appears.
- There as a last option of choose file, the save as from the menu bar. The save as dialog box appears.
- Before clicking save button in the save as dialog box, first name your file with a descriptive name that you will remember.
- To name you file, once the save as dialog box is open, the current file name appears highlighted, ready for you to change it.
- Type a short descriptive name in the file name box. File names can include spaces and capital letters but not special characters.
- If you do not choose a file name, word program will assign a file name for you. It assigns the first line of text in your document. If you save a blank document, the file will be saved as Doc1, Doc2 and so forth.
- After you name your file, choose a file location. This will keep your files orderly and easy to find. My documents is the default file location in word program.
- To save a file in My documents, make sure My documents is the current file location in making sure the left column and save in drop-down box state my documents.
- Click save button.
NOTE
Save – is used when saving file for the first time, it doesn’t matter if you choose to save it using save or save as.both commands open the save as dialog box.
Save as – lets you save an existing file under a new name, allowing you to create a new file.
Retrieving documents
- Open a Microsoft word
- Click file in the upper left-hand corner of the screen.
- Click open
- An open dialog box will pop up. From this, find your way to the file in which your document is saved. Files that are on your computer can be located by clicking browse.
- Once you have located your document and clicked on it to select it, its name will be shown in the file name box at the bottom of the dialog box.
- Click open. The document will then be opened.
Safety when using computer devices
- Turn on the computer correctly. Follow the right process.
- Respect yourself by not giving your name and password.
- Prepare early for each task. Using time wisely
- Respect others by sharing computer devices.
- Report problems with the computer devices. It saves time and energy.
- Take responsibility for your actions.
- Log off and leave the computer station ready for the next person to use.
Project
Make a Digital Personal Journal
CODING
Patterns and games
Simple programming using scratch.
- The scratch language has similarities to children’s building brick toys.
- It uses a simple structure of graphical bricks or blocks of computer code.
- They snap and interlock together to build and control sound, music and images.
Main parts of scratch
- Menus – this part contains the file menu used to save or load your projects.
- Main tabs – this part helps a user switch between different activities, such as coding, drawing or adding sound.
- Blocks categories (Blocks Palette) -this part contains a coloured set of code blocks that are used to program the sprite and give actions to it.
- Code blocks -these are blocks that are shaped differently and are used to create code in scratch. The blocks connect to each other vertically like a jigsaw.
- Coding area (sprite area) – this is the place where you create a code (script) for a sprite to do a specific action. You drag and drop the code here and snap them together to create your programme.
- Start and stop – you click the green flag to start your code or the stop sign to stop the code.
- The stage: this is the main working area where the sprite moves and performs as per the given code of instruction.
- Sprite – this is a small graphic character that performs actions, such as moving around in the stage.
- Sprite info – this part of scratch shows information about each sprite, such as how big it is.
- Sprite list – this part displays all the sprites in your project. The selected sprite has a blue border around it.
- Choose a backdrop – this part is used for adding a new background to your project.
- Choose a sprite – this part is used for adding a new sprite to your project.
- Tutorials – this part contains some help videos. Click the white X to close it.
Sprites
- The sprite info is where scratch displays icons of the sprites that are being used in the current project.
- A sprite is an animated character or object in your program.
- Sprites can move around, be active or be objects that stay still. These actions are determined by the scripts that your create. The scripts tell the sprites what to do and what actions to perform.
- The cat sprite called Sprite1 always appears by default when you create a new project.
- To add a new sprite to a scratch project, you use the
icon in the button right-corner of the pane.
- Clicking this button allows you to choose from a library of already existing sprites offered for free on the scratch program.

The options include the following
- Upload sprite – this button

allows you to upload a sprite from your computer.
- Surprise – this button randomly selects a sprite from the scratch library and inserts it into your current project.

- Paint – this paint brush button creates a blank sprite with an empty costume.

Choose a sprite – this button allows you to choose a sprite from the library.

Creating animation using scratch.
- Start the scratch 3.0 from your desktop by clicking the icon below.


At the moment we only have one sprite, a cat named scratchy labelled sprite1.

- By placing blocks in the coding area, we give instructions to the sprite.
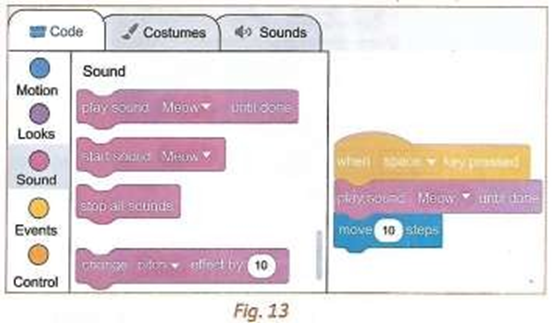
- first , go to the blocks Category section located at the left- hand side of the scratch interface which contains thematic folders of blocks of code such as the following:
- Motion – these blocks of code control the movement of the sprite
- Looks – these blocks of code change the appearance of a sprite.
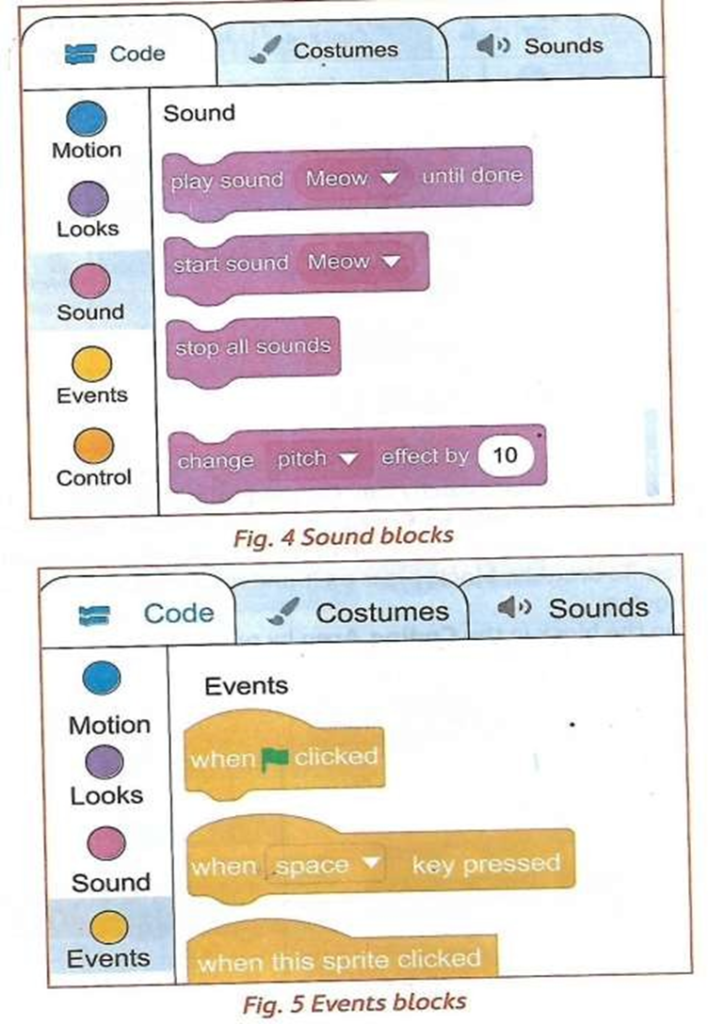
- Sound – these blocks of code add and control sound in your scratch project.
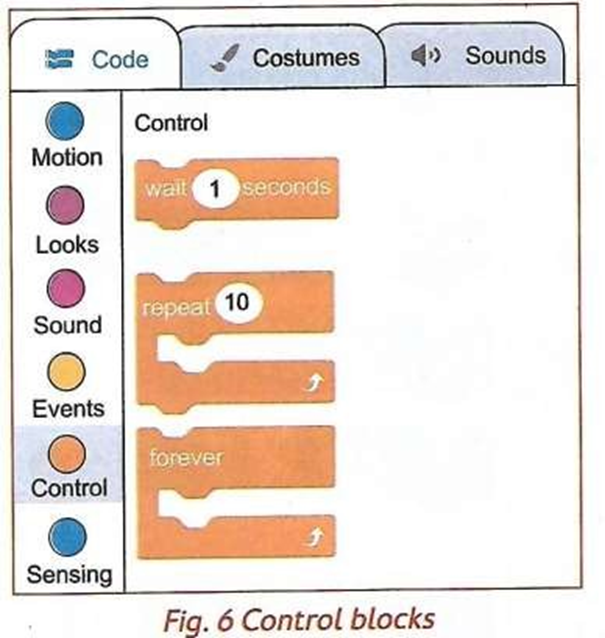
- Events – these blocks of code control when and how the scripts or codes are activated.
Control – these blocks of code control how the scripts or codes run

- Now let us make a scratchy run. On the main tabs, click on the events from the blocks categories. Select when the space key pressed block and drag it from the code blocks to the coding area. To drag the block, press on it and hold the space key while dragging.
- Drop the block in the coding area by releasing the mouse button as shown below

Next, switch from events to motion in the blocks categories. Select move 10 steps block and drag it from the code blocks to the coding area
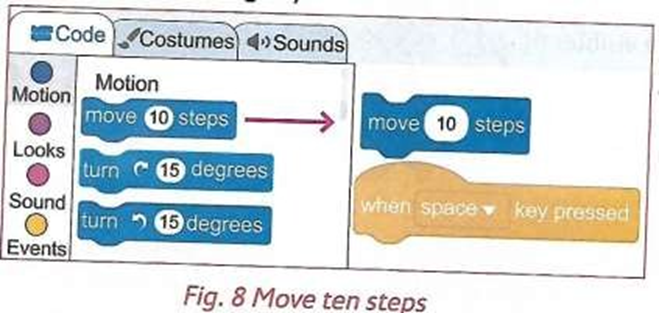
Position the block under the events block by pressing the space key.

Release the mouse and the motion block will attach and fix itself under the events block.

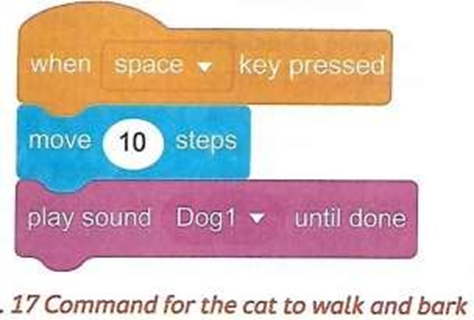
You have managed to create your first code. Press the space key and watch how scratchy moves. If you keep pressing the space key, scratchy will go to the edge of the stage. The tail will still be visible

- To bring scratchy back, press on its tail, and drag the cat back to the center of the stage. You can press the space key again to move scratchy to the right. Drag it once more to the left side of the stage.
- Next, give sound to the source code. Make the scratchy Meow. Switch from motion to sound in the blocks categories. Select play sound Meow until done block and drag it from the code blocks to the coding area.
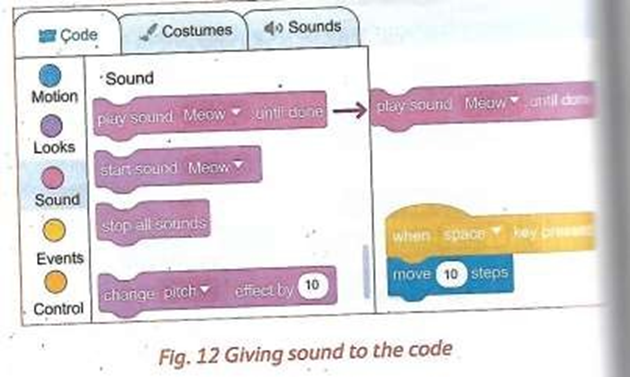
Fix it under the motion block. Scratchy is now moving and meowing when you press the space key.
If scratchy meows too loudly, adjust the volume by going to the main tabs, then clicking on sounds tab. Then reduce the volume by continuously clicking on the softer sound icon.

If you tire with meowing, you may add new sounds. Let us make scratchy bark. Go to main tabs, click sounds tab. Click on the choose a sound icon. It will open the sound library. This contains different types of sounds. Select animal.
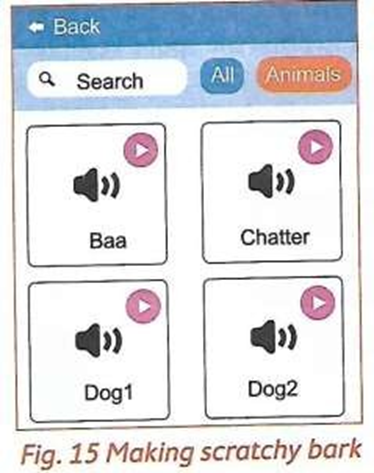
Click on the Dog 1 sound. Now, we can use two different sounds for scratchy. Go to the code tab, then the code blocks section. On the play sound meow until done block, click on the drop-down menu. Select Dog1 sound

Save your project. Click file. Next, click save to your computer. You will see the save window where you enter a file name.