Grade 8 Notes CBC Junior Secondary 2024
Computer case
The computer case is the metal and plastic box that contains the main components of the computer, including the
- Motherboard,
- Central processing unit (CPU), and
- Power supply.
The front of the case usually has an On/Off button andone or more optical drives.
- Computer cases come in different shapes and sizes.
- A desktop case lies flat on a desk, and the monitor usually sits on top of it. A tower case is tall and sits next to the monitor or on the floor.
- All-in-one computers come with the internal components built into the monitor, which eliminates the need for a separate case.
Monitor

The monitor works with a video card, located inside the computer case, to display images and text on the screen. Most monitors have control buttons that allow you to change your monitor’s display settings, and some monitors also have built-in speakers.
- Newer monitors usually have LCD (liquid crystal display) or LED (light-emitting diode) displays. These can be made very thin, and they are often called flat-panel displays.
- Older monitors use CRT (cathode ray tube) displays. CRT monitors are much larger and heavier, and they take up more desk space.
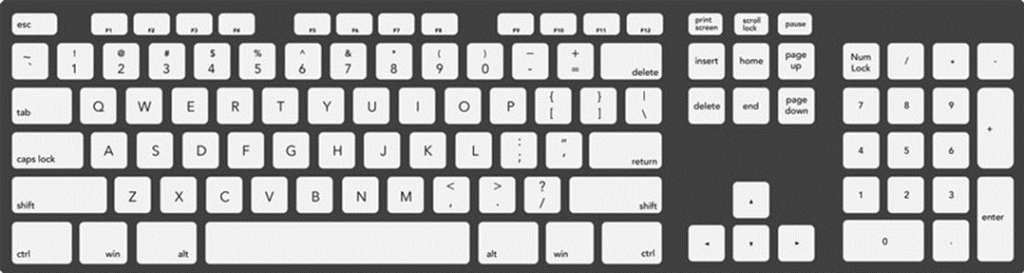
Keyboard
The keyboard is one of the main ways to communicate with a computer. There are many different types of keyboards, but most are very similar and allow you to accomplish the same basic tasks.
Mouse

Grade 8 Computer Notes For Junior Secondary(JSS)- CBC
The mouse is another important tool for communicating with computers. Commonly known as a pointing device, it lets you point to objects on the screen, click on them, and move them.
- There are two main mouse types: optical and mechanical.
- The optical mouse uses an electronic eye to detect movement and is easier to clean.
- The mechanical mouse uses a rolling ball to detect movement and requires regular cleaning to work properly.
Mouse alternatives
There are other devices that can do the same thing as a mouse. Many people find them easier to use, and they also require less desk space than a traditional mouse. The most common mouse alternatives are below.
- Trackball: A trackball has a ball that can rotate freely. Instead of moving the device like a mouse, you can roll the ball with your thumb to move the pointer.
- Touchpad: A touchpad—also called a track pad—is a touch-sensitive pad that lets you control the pointer by making a drawing motion with your finger. Touchpads are common on laptop computers.
Assembling and disassembling computer case
Part1: How to assemble a CPU step by step
This part is all about CPU assembling. Specifically, you have to be very careful with this process.
Following are the steps to assemble CPU:
- Take Inventory
- Make space and time
- Prepare your CPU case
- Install motherboard
- Install the processor
- Install the processor heat sink
- Install the RAM
- Install SMPS
- Install the HDD
- Install CD/DVD drive
- Connect Expansion cards
- Install SYS/Rear cooling fan
- Bus cable connection
- Power Cable connection
- Front Panel connector connection
1. Take Inventory:
Before you start, take inventory of your parts. Make sure you have the following components and tools with you.
- Case/ Tower/Cabinet
- Motherboard
- Processor
- Heat Sink and CPU Fan
- SMPS
- Hard disk drive
- CD/ DVD drive
- RAM
- CMOS Battery
- A good screwdriver sets
2. Make Space, Make Time:
Building a PC takes space. You can use your dining room table to build your PC. So, make sure you have plenty of working space and a few hours to proceed with minimal interruption. You must work on a flat, stable tabletop surface or bare floor, where you have room to lay out all of the items, to begin with, assemble.
3. Prepare your CPU cabinet:
Now it is time to prepare the case. Remove the case cover from the CPU cabinet.
You need to check Screw brass standoffs are perfectly placed or not. If it is not in a proper position, in that case, you need to position them accurately. (always check the manual and follow their instructions)
4. Install the motherboard:
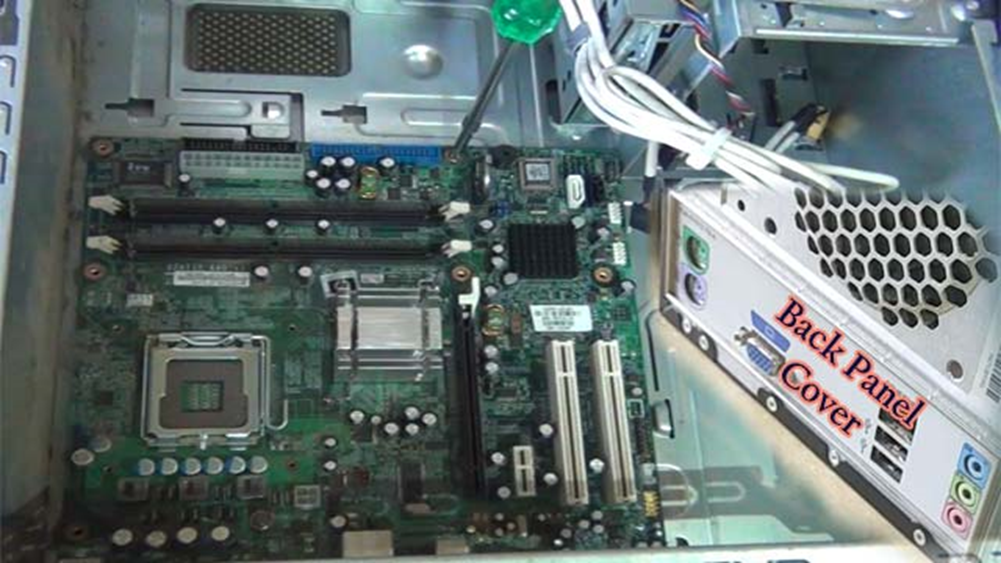
You must take great care, especially when installing the motherboard. First, remove the motherboard of its packaging and put it on top of the antistatic bag it came in. Remember, you always want to safeguard your components from potentially hazardous static electricity.
- You need to secure the motherboard onto the PC case/chassis and inspect carefully for any visible defects.
- Next, review the motherboard handbook, to make sure you are familiar with the motherboard layout and understand which socket is which. Manuals are immensely helpful, usually easy to read, and include illustrations instructions.
- Check the layout of the sockets on the motherboard. And confirm that the ports on your motherboard’s back panel match the holes on the case’s Input/output (I/O) shield installed in your case. If it is necessary, then remove the old I/O shield by tapping it firmly a few times with the thicker end of a screwdriver. And then replace it with the shield that came with the new motherboard.
- You need carefully position the motherboard on top of the brass standoffs. After that line up all the holes, use the screws that accompanied the case to fasten down the motherboard.
- Don’t forget to place the CMOS in the proper position.
5. Install the processor (CPU):
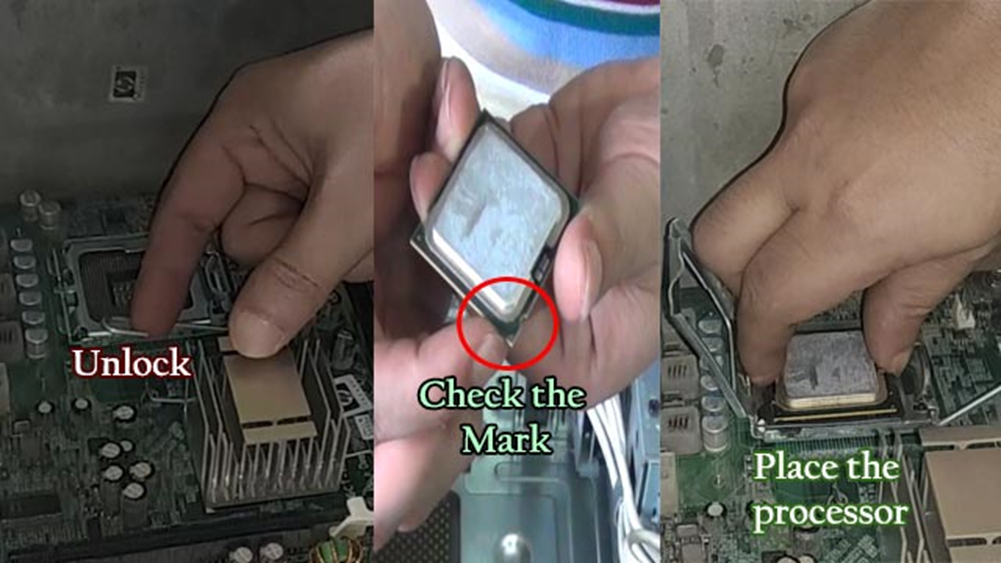
- Use the unlocking mechanism to open the CPU socket which is, usually a lever.
- Carefully line up the pins and place the chip in its socket; it will fit only when oriented correctly. An arrow or a missing pin on one corner of the chip will show you how to line things up.
- Align with the triangular symbol with the processor and socket key marks, as shown in the Figure.
- Lower the lever to lock the CPU into place.
Grade 8 Computer Notes For Junior Secondary(JSS)- CBC
6. Install the CPU heat sink:
You should follow the manufacturer instructions to install the heat sink and the cooling fan. If you bought an OEM CPU and a separate heat sink, then you need to spread a thin layer of the thermal grease over the chip. The thermal grease ensures proper transfer of heat.
There are some heat sinks that come with this grease already applied. In that case, you don’t need to use thermal grease over the chip.
- Attach the clip that holds the heat sink in place, keeping in mind that it may require a fair amount of force. Again, follow the instructions that came with the heat sink. They will show you how to fit it correctly. If you are in doubt, you can visit the manufacturer’s website for more information.
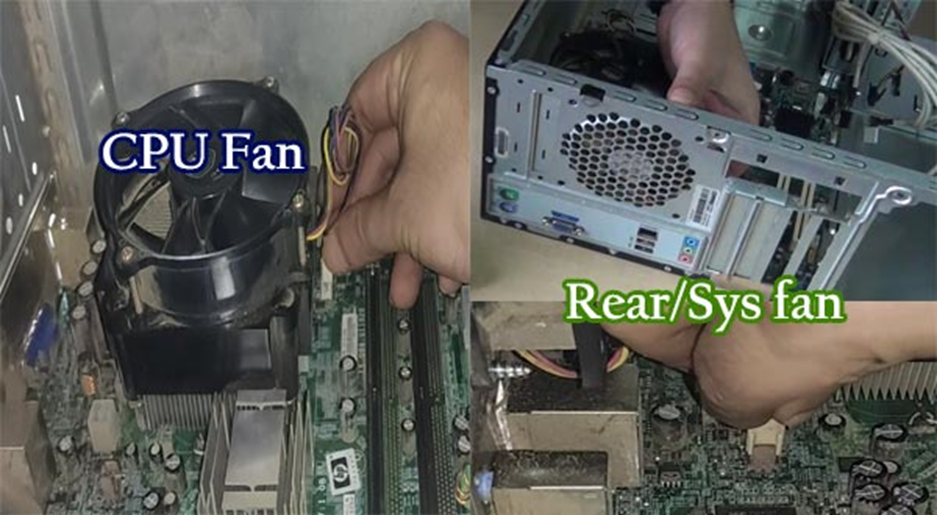
- Plug the CPU fan’s power connector into the proper connector on the motherboard.
7. Install RAM memory:

Fig: Install RAM
- Unlock the two tabs from both ends of the RAM slot.
- To install the RAM, insert them into the proper sockets and push down firmly but evenly until the clips on both sides of the socket pop into place. If your motherboard supports dual-channel memory, consult the user manual to determine which pairs of RAM sockets you should use.
8. Install the Power Supply Unit (SMPS):
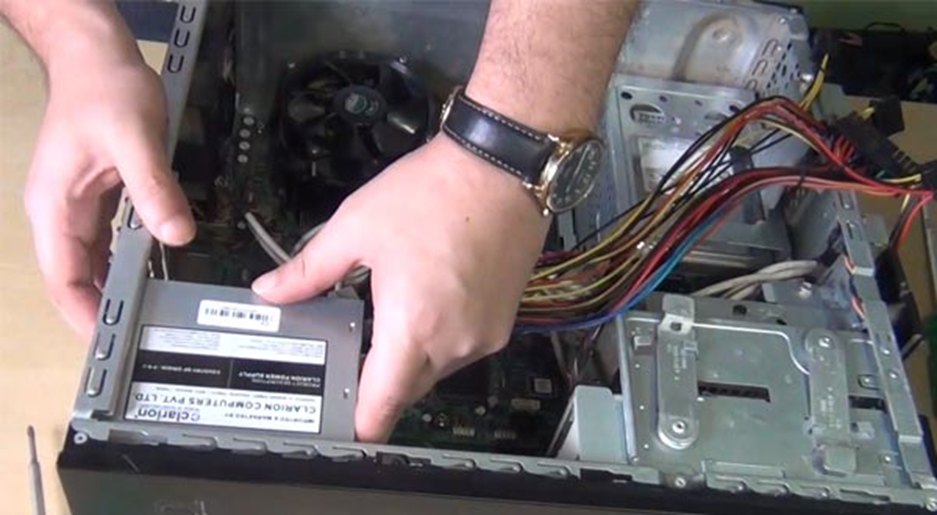
- Place the SMPS inside the CPU cabinet in the proper position. If you are not able to find the correct location, then check the manual.
- Final steps, to install SMPS, you need to tighten the screw to secure the SMPS to the case.
9. To install HDD:
You can see a 3.5 inch bay inside the CPU cabinet. If you are unable to find it, then check the manual of the case to identify the bay location. Place the HDD inside the bay properly
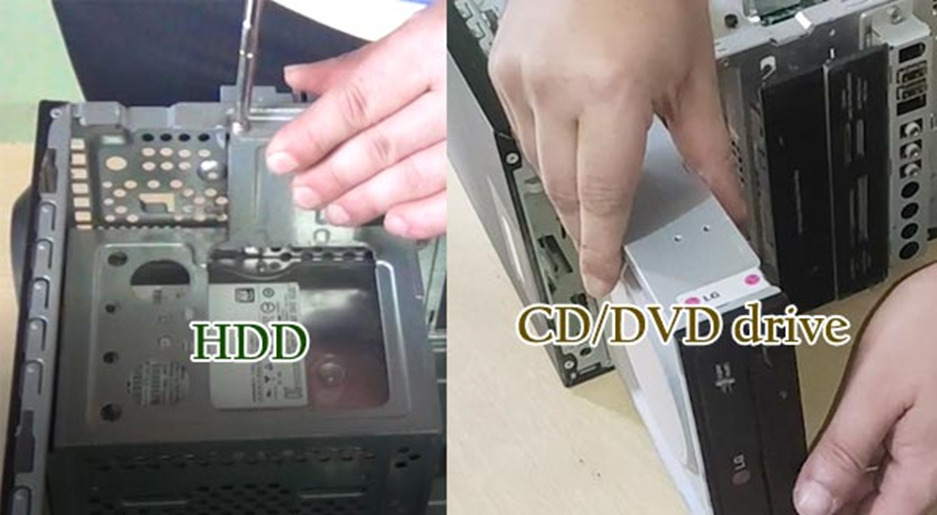
10. To install CD/DVD:
You can see a 5.25 inch bay inside the CPU cabinet. If you are unable to find it, check the manual of the case to identify the bay location.
Place the CD/DVD inside the CPU cabinet to align with the 5.25-inch bay. And, finally, you need to tighten all the screws to hold firmly.
11. Install Expansion cards:
Expansion cards help to increase the functionality of your computer. You can place Expansion cards on the motherboard.
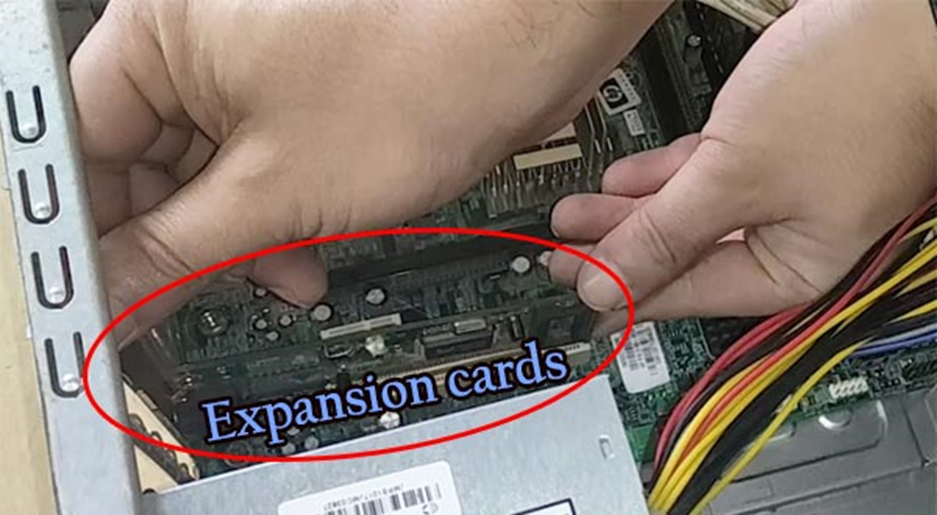
PCI compatible expansion cards can place on the PCI slots of the motherboard.
PCI-e compatible expansion cards can place on the PCI-e slots of the motherboard.
Video cards or graphics cards can place on the AGP slot of the motherboard.
You must know about various parts of a motherboard such that, you can effortlessly identify the different connectors.
Grade 8 Notes CBC Junior Secondary 2024
12. Install Sys/Rear cooling fan:
Find the location where you can place the Sys/Rear cooling Fan. Generally, SYS/Rear cooling can place below the SMPS.
13. Bus cable connection:
Amazingly, bus cable or data cable connections are prime connections. Bus cable helps to share information or data between the storage device and motherboard.
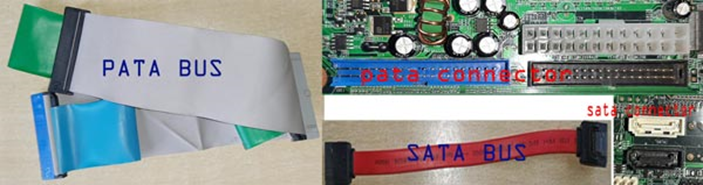
If your motherboard has a SATA Bus connector, then you need to use SATA cables. AND if your motherboard has a PATA Bus connector, then you can use PATA cable or IDE cable.
In general, two bus cables need to connect inside the CPU. First, Bus cable connects the HDD and motherboard. And the second Bus cable connects the CD/DVD drive and motherboard.
14. Power Cable connection:
This one is the final step of assembling a CPU. You need to provide power to the different parts of the CPU. Plug the ATX power connector from your power supply into the matching port on your motherboard.
- You can find a 20/24 pins ATX power connector port on the motherboard. The 20/24 pins ATX power connector cable coming from SMPS needs to connect here. Check the lock system in both ends of the connector and the port, and place it properly. As always, refer to your motherboard’s manual for the exact locations.
- There is another 4-pins ATX power connector port, you can find on the motherboard. You can locate this port near the processor socket. You must connect the 4-pins power connector in this port properly.
15. Front Panel connector connection:
Use your motherboard user manual and find the description of front-panel connectors.
First, attach each of the tiny leads from the power and reset switches. After that, the hard-disk activity lights, the PC speaker, and any front-panel USB to the corresponding pin on your motherboard.
Part2: How to assemble PC
This one is the final part of assembling a computer system.
- Check your keyboard connector port. If it is a USB connector, then connect your keyboard into the proper USB port. And if it is a PS/2 connector, then connect to the correct, PS/2 port.
- Same steps you need to follow to connect your mouse into the proper port.
- You require a VGA (Video Graphic Array) cable to connect the monitor and CPU. Find the 15 pins male connector on the backside of the CPU cabinet and your monitor. Use the VGA cable to connect the CPU cabinet and the monitor. Finally, you need to tighten the lock screws.
- If you have a speaker, you can connect the speaker on the backside of your CPU cabinet. To get sound from the speaker, you need to plug the speaker’s cable with the Aux port.
- And if you have a printer, you can connect the printer on the backside of your CPU cabinet. These days, you can connect your speaker BUS cable on the USB port.
Finally, connects power to the various parts of your computer. You have to connect the power cable with the CPU case, monitor, speaker, and printer.
Grade 8 Notes CBC Junior Secondary 2024
Check your PC Set-Up:
It is time to turn on your system and check your PC set up. Make sure the keyboard, mouse, and monitor are all plugged into the appropriate ports on the back of the PC. Plug the power cord back in, and turn the machine on.
To boot a computer you need hardware and software. Till now you have understood to assemble a computer. If you want to work on that computer you need to install an Operating System.
If you do not know how to install an operating system on a computer, check the following two articles:
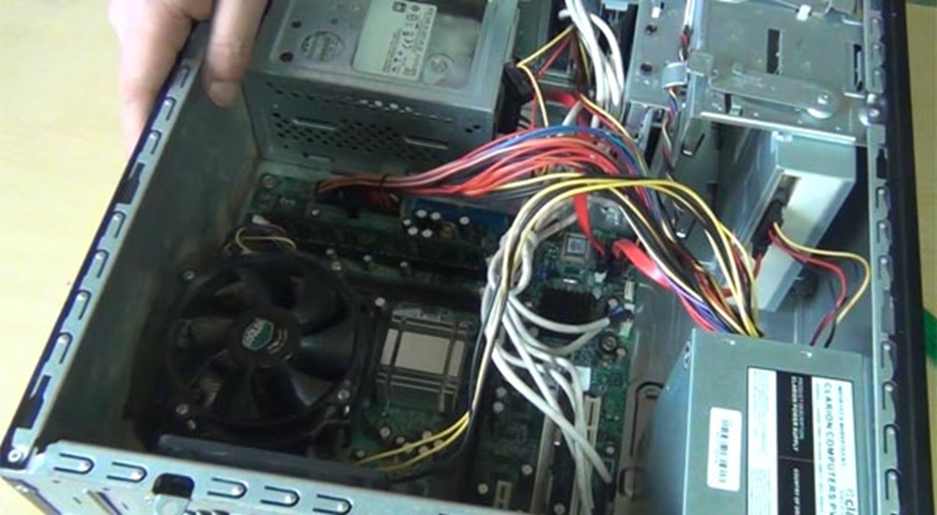
Disassembling a PC?
Disassembling a PC means disconnecting the different components of a PC.
Steps for disassembling a PC
Generally, people want to know both assemble and disassemble steps of a computer. Therefore I am sharing my ideas to help you to assemble and disassemble a computer system.
- Unplugged the AC power supply to the PC from the wall socket
- Remove the Cover or chassis or case.
- Unplugged bus cables and ATX power cables
- Remove Adapter Cards if any
- Now Remove the processor and the heat sink and fan
- Remove hard disk and CD/ DVD drives
- Next, remove the Memory Modules
- Remove the Power Supply (SMPS)
- Finally, Remove the Motherboard
1. Unplugged the AC power supply to the PC from the wall socket
This one is the first step to begin a PC disassemble process. Always remember first disconnect all the power supply connected to your computer system before starting to remove parts.
2. Remove the case covering
Loose the screws and remove the case covering to access the inside parts of the CPU cabinet case.
3. Unplugged bus cables and ATX power cables
Disconnect all the cables one by one inside the CPU case. First, disconnect ATX power cables from the motherboard. After that, disconnect power supply cables, bus cables from the HDD/SSD, and motherboard.
4. Remove adapter cards if any
If any adapter is connected then, disconnect the card from the motherboard.
5. Remove the processor and the heat sink and fan
Now its time to remove the heat sink from the motherboard. Generally, the CPU fan and the heat sink attach together. If it is separated in that case, you need to remove the fan first after that, you can remove the CPU heat sink.
In the final step, unlock the processor socket and remove the processor from the motherboard carefully.
6. Remove hard disk and CD/ DVD drives
Its time to remove the other parts of the computer system. Remove the Hard disk drive or SSD from the motherboard. You can also remove the CD/DVD drive from the CPU case.
Sometimes, to remove CD/DVD drive from the CPU case, you need to remove the front cover of the CPU cabinet case first. After that, you can remove the ROM drives.
7. Remove memory modules
In this process, you do remove the RAM from the motherboard. First, unlock the RAM from both ends and pull the RAM carefully.
8. Remove the Power Supply Unit (PSU)
Already you know, SMPS supplies power to the various parts of the computer system. Here you need to remove the SMPS from the CPU cabinet case.
Grade 8 Notes CBC Junior Secondary 2024
9. Remove the motherboard
The final step of the PC disassemble process is this one. Carefully remove the motherboard from the CPU cabinet case.
Note: Remember, bolts or screws are the very essential things. They help to make rigid, all the parts used inside the computer. To remove any part from the computer system mostly, you need to take out bolts first. Here in PC disassemble steps, I have ignored that portion.
Conclusion
Assembling and disassembling a computer system is not a difficult task but requires keen observation and knowledge of the different components of the system. You need to be extra careful when fitting in these components and make sure that they are not fitted forcefully but firmly.
In case of hardware failure or to install new add-on cards, you need to have good knowledge to assemble and disassemble a computer system